Sunday, August 19, 2012

Ultramarines!

So, a slightly longer than hoped for delay before this post.  I'm not complaining though!  Work over the past few weeks has been a little bit slower than I would prefer, and this week was busier again.  It's always nice to be able to pay the bills!  This is going to be another photo heavy post, with lots of photos of my most recent army, my Ultramarines.  The Smurfs seem to be a very polarizing army.  People seem to either love them, or hate them.  Me, I used to hate them, but that was due to their color scheme (shuddering at the thought of the second edition uber-bright paint jobs!)  Since their paint job was updated I'm pretty ambivalent toward them.  Why go to the time and effort to build an army I'm ambivalent toward?  I decided years ago that "some day" I would build an Ultramarines army so I would have a vanilla marine army that was obviously vanilla marines.  This past spring, while deciding what army to build and paint for the Alamo 40K GT I decided it was time.  I also built the army with primarily infantry models.  I get SO tired of all the mechanized forces on the tables!  Yes, Razorspam is a good, strong list, but be different!  Show some originality!  As I was building models, I also decided to clean out my bitz box some.  I built 1 full tactical squad from just bitz!  With the help of a friend (a backpack or 2 and a couple of arms if I remember correctly) I also fleshed out 1 devastator squad and built a second.  Toward the end, seriously scrounging through the box, I built a Vanguard Veteran squad too!

A few years ago, I bought a couple of cans of Ultramarines Blue spray paint from some friend's hobby store.  I'd nursed those cans along, shaking them up every couple of months to nurture them until I was ready to paint blue.  The big day came, and after 1 short burst, the first can clogged up!  Nothing I tried got it working again.  I tried the second can: same thing!  I knew I didn't have time to base coat all of those models by hand and still get them done in time for the Alamo in May (this was about mid February.)  Out came the previously unused airbrush.  I re-read all of the articles I had downloaded, and went to work familiarizing myself with this new tool.  After a couple of weeks practicing with ink on paper I figured it was time to bite the bullet and shoot some paint.  Long story short, I sprayed the base coat, and a couple of highlights on over 100 models in about 5 hours.  That time included cleaning the airbrush in between each color for practice doing it.  With all of the time I saved NOT base coating with a brush, I was able to spend more time on detail.  I've received many compliments on these models, and they helped take me to Games Day again this year. I still have 3 or 4 units to paint, but well over half of the army is done.  I'll probably try to finish them off, and be done painting Smurfs by the end of the year; see how it goes.  Here's the boys in blue:

At Games Day!  "Primus Inter Pares," "First Among Equals."  Ultramarines.  A received what I consider to be a HUGE compliment on this army while at Games Day.  I was speaking to Phil Kelly, Games Designer, and having him autograph my Space Wolves Codex.  I mentioned that in addition to Golden Demon, I had an army in Armies on Parade again this year.  He asked which one.  I told him, "The Ultramarines display with all of the columns."  His eyes got big, and he stood up saying he wanted to shake my hand.  He told me the display was , "Spot on. You totally nailed the Ultramarines with that display."  He asked what the Latin on the display meant.  I told him, and he got a grin on his face and said, "Nice!"  That brief exchange made my day!  Little did I know the day would get even better that afternoon! Thanks for the compliment Phil, you have no idea how much it means to me!


"Dirty Steve" formerly of White Dwarf photographing my display.  Youngsters tripping across this won't remember Dirty Steve, but us Old Timers do!  It was a pleasure to meet him in person and chat while he was taking these photos!

The army as it was when I made the trip to San Antonio for the Alamo 40K GT.  The vast majority of what is on the display was painted in a 3 week binge.  The Inquisitorial Drop Pod, and the black (Deathwatch) marines in the foreground are Sternguard Veterans.  I've always liked the Deathwatch, and when I saw the Sternguard rules in Codex Space Marines I KNEW that I would have a unit painted as Deathwatch.


Tactical marines.  Yep, there are 3 full squads of them and the rest look just like these! Well, different squad markings.


The 3 tactical squad sergeants; with banners color coded to their squads.....yeah, its a sickness.


A squad of Devastators ready to provide covering fire!

 
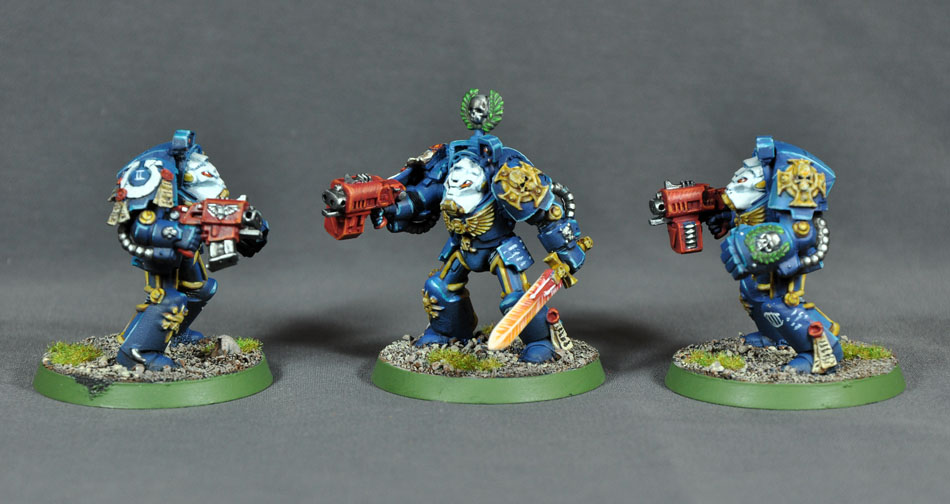
A couple terminators with their sergeant.  Forge World shoulder pads.


Assault Termies this time.  FW pads again.


The drop pod; Inquisition icons on all doors!


Opened up.  Object source lighting inside.  Forge World etched brass above each doorway, and on the floor in each doorway....did I mention its a sickness?


Some of the Deathwatch/Sternguard.  There are 10 total, 11 if you count their Librarian.  Of the 11, 6 of the chapter symbol shoulder pads are ones I sculpted myself.  The muzzle blast bits came from a friend of mine.  Yep, more brass etch on each of their backpacks.  I HAD to help designate them as Inquisition didn't I?  Well, DIDN'T I?


Some assault marines, including a captain with jump pack.


Another view of the captain.  You can get a pretty good look at the "cross hatch" style highlights I used extensively on these models.  Its an artistic technique I've seen in graphic novels and first saw used on models in a GW store that had been painted by the store manager.  Its fast, and looks pretty good on the table top I think.  I get quite a few comments on the style; all positive so far!


The cloak.  I was really pleased with how this turned out.


The 2 Librarians.  One Ultramarines, and one Exorcists Chapter, seconded to the Deathwatch.  I got lucky with this model because the Chapter symbol for the Exorcists is the same horned skull as the symbol for Librarians.  I changed the skull on his belt buckle to a horned skull so he has a Librarian symbol on him and I was set!  Green stuff is your friend!


Heavybolterbob!  In case you haven't noticed, most of the models are on assault legs to look like they are running forward to get into position.  The Devastators are all kneeling since they are holding position and steadying heavy weapons.  All of the models have free hand on them as well.  Litanies, squad markings, and a Roman numeral 13 on a knee pad for the 13th legion.


Another angle to show the kill markings on his Heavy Bolter!


This Land Raider isn't mine!  I traded the assembly and painting of it for some models.  I knocked it out (along with lots of other stuff) the week leading up to Games Day so I could include it on my AoP display board.  I think it turned out pretty well, and the owner is happy with it!  As an added bonus he can say it was displayed at Games Day!


These on the other hand, ARE mine.  Two of the very few vehicles that will be in this army.


 An old school pewter dreadnought that I was given in pieces!  He had 3 or 4 nasty-thick coats of paint on him and he was missing a foot!  I stripped the paint.  I converted him slightly using feet from a Imperial Guard Sentinel I had in my bitz box.  I pinned him all together and pinned him to the base.  I jazzed him up with some Forge World icons, and here he is.  I probably should have named him, Phoenix.


Last but not least, me with the AoP display, and Jawaballs Ultramarines banner.  This was Jawaballs' 4th straight winning entry in the banner contest at Games Day.  He was gracious enough to let me display my army along side it AND he took the photo.  Thanks Jawa!


Yes, that is a Silver Demon from the Golden Demon painting competition next to the army.  That's for another post!  This one is for the Ultramarines!  I learned an absolute TON while painting this army.  They won me my 2nd straight Best Painted at this year's Alamo 40K GT in May.  I also won 3rd Player's Choice at the Alamo.  They won best painted at a local tournament in Montana in June while I was visiting family and friends.  They won me a second Parade Day qualifier, which paid for my ticket to get into Games Day.  Models from this army have also been featured in the Photo of the Day on Bell of Lost Souls.  If that's how you feel about the Ultramarines, you can hate on them all you want, but I like my Smurfs!

Tuesday, August 14, 2012

40K 6th Game 2 Plus Space Hulkamanders!

So, I got in my second game of 6th Edition last night.  I lost again, but it was a ridiculously close game with lots of back and forth, and good and bad dice rolls on both sides.  The game would have been a draw except my opponent scored points for First Blood, and killing my Warlord....gotta love advancing into the guns playing Tyranids!  The silly part about the game is my opponent won with 1 wounded model left on the field.  His Nurgle Sorcerer in Terminator armor had 2 wounds left.  Stupid toughness 5 and 2+ save!  I had around 30 models on the table; mostly free spawned termagants.  Fortunately (for him) I had explained to James earlier in the game how he could use "Look Out Sir!" to protect his Sorcerer.  Oh well, it was a fun game.  I still don't like the random charge distance, even though I generally rolled better for it this game than last.  I also didn't need to roll well, because I tried to set myself up so I COULD roll crappy and not have it matter.  In one case I only needed to roll a 2 on 2d6 which was good, because I rolled a 4!  On 2 other occasions I rolled 12 on 2d6 (unheard of!)  Again, it didn't matter because I only needed about 5 inches in both cases.  The jury is still out.

Enough of that!  Here's some painting!  Still showing stuff I have done over the past few months; these models were finished back in March or April.  These models are the Space Hulk Terminator models.  I painted them up as part of a trade with a friend of mine.  I was originally supposed to paint them "just like the ones from the box."  Before I got to them however, my friend decided that since he doesn't often play Space Hulk he'd rather have them painted in his army's colors, green for Salamanders.  He carved all of the Blood Angels iconography off, based them, and then I was off and painting.  He added Forge World shoulder pads wherever he could.   He also included 1 old school pewter model with a bionic leg (he has a "thing" for models with bionics) and converted up a power fist into a narthecium so I could turn the kneeling model into an Apothecary.  He also requested a crazy half, half, and half color scheme on the Apothecary.  After painting 1/2 of these models I took a break, learned how to use my airbrush, and base coated all of the armor on about 100 Ultramarines models in 1 day.  THEN I had to go back and look at Hulkamander squad two!  Did I want to painstakingly build up the highlights by brush, or dig out the airbrush and have them look better in a tenth the time?  No, they needed to match, so I went to work with the brush again.......here's the results:

All of the models


The Librarian and a couple dudes.  I was happy with the armor and the robe on the Librarian.


The commanders and the flamer.  I like how the sword turned out.
 

Another angle


Just an assortment of the models


The last 3 models I finished.  I was pleased with all of them for one reason or another.


Top view!


I'll hopefully have more pics up by the end of the week. It depends on how work goes.  With the next post we'll be getting into my most recent stuff.  I'll be showing my Ultramarines army!  I also started teaching a local guy how to paint last night.  He hadn't touched a brush in about 10 years because he just never got a model he was happy with.  So far he's tickled with the results he's getting.  Hopefully more on that front after next Monday night.  With luck we'll finish the 3 models he's working on.  If not, then it will be the following week.  Either way, watch for updates!

Sunday, August 12, 2012

First Game of 40K 6th Edition!

Well, it's been a long and crazy week.  I actually played my first game of 6th edition 40K last Monday night, but am just now getting to write about it!  We played a 1250 pt. game, since it was my first, and nobody locally really has many games under their belts yet.  We figured that would help us get done in a reasonable amount of time.  Not sure that worked; the game took MUCH longer than I expected it to.  Not just due to the newness of 6th edition.  For the first time in about 11 months, I fielded my Tyranids.  I spent more time than normal looking things up on my army list to check stats.  I guess that's to be expected when you move from army to army.  Fortunately Kirk, my opponent, also plays 'Nids sometimes and he was able to help keep me on track!  He played a fairly generic list out of Codex Space Marines.  He turtled up behind his Aegis defense line, and I tried to get across the board to give him some Tyranid style loving.  I lost. 

Now that we have that out of the way, what are my impressions?  Good and bad.  First, Tyranids are really slow in this edition!  Not being able to assault after running hurts a lot!  I'm sure there are those out there that will yammer about being able to charge 2d6 inches instead of 6.  Who cares?  I only had one charge go over 7 inches in the game (even with the Warlord trait giving a bonus inch) and that one was termigants assaulting a Rhino!  Yes, I had bad dice rolls for charging.  Still, losing any meaningful benefit to "Fleet" is another good sized boot to the teeth of the bugs.  A boot that hurts all other armies that utilized fleet in the past as well.  The "no assaulting the turn you outflank" rule is another kick in the the teeth.  I thought the previous rules for deployment, outflanking/infiltrating, and assault worked pretty well, and I don't always play bugs!

On an up note however, I like the new hull point rules!  A lot!  Over the years I have drawn, or lost numerous games because I was unable to roll better than a 2 on the vehicle damage charts.  I'm talking with multiple armies here.  Now, I still get some gradual benefit from those crappy rolls!  A unit of free, spawned termigants can charge and destroy a rhino.  A lone Genestealer can (with miraculous dice rolls) pull off the very "cinematic" attack on the hovering Stormtalon and drag it from the sky. Hull points is definitely a rule change for the better.

Good and bad, I still have hopes for this newest incarnation of my favorite game.  Every edition people talk about the "pendulum" and how the game swings back and forth.  Why, like an actual pendulum," does it never seem to slow and achieve some middle ground?  Why am I feeling more and more like the rules are pigeon-holing me into a specific style of play?  Why, for the first time in over a decade, am I looking seriously at other games?  I know all of these questions make it appear that I'm down on Games Workshop and 40K.  I'm not really.  I am less willing to give as freely of my time to aspects of this hobby that are not as fun as they used to be.  These days, I generally have less fun playing the game, and more fun modelling and painting.  I'm actively trying to get all of the models I "need" for existing armies bought before the next price hike.  I'll focus on getting it all painted then.  My HOPE is that negative aspects aside, 6th Edition 40K starts to turn the situation around some and I start to enjoy playing the game more again.  Fingers crossed!  I know I can't count on my dice!

Thursday, August 9, 2012

On photographing Toy Soldiers

First off, a big shout out to Dave Taylor, who's blog you can get to buy clicking here.
 Dave graciously allowed me to copy the disclaimer from his blog so I can (hopefully) avoid any unwanted contact from the big bad toy soldier manufacturing corporations!  Thanks Dave!  If you get a chance to meet Dave, do it.  I attended some painting and modelling workshops he taught at WarGamesCon a couple of years ago, and have chatted with him a little bit the past 2 years at Games Day in Chicago.  I don't claim to know him well, but he's always friendly and helpful.  I haven't yet had the chance to stand across the table from him and roll dice, but I hope to some day; I'm sure he'll make a fun opponent!

Well, much has happened since my last offering.  I played my first game of 6th Edition 40K.  I've helped a couple guys out with some painting tips.  But, something just came up in the past hour while I was checking out a gaming group I belong to on Facebook: The Gaming Garage....check these guys out, there's lots going on!  One of the guys is looking to sell some of his armies for personal reasons.  His photos are not doing his painting any justice.  I know, I've seen some of the models in person.  I decided to hold off on talking about my first 6th Ed. game, and the rest for now, and post an article I wrote a year or so ago to help people take better photos of their models.  Some friends of mine own a hobby store called Heroic Realms in Kalispell, Montana.  I was asked to type this up to answer a question on the forum at HeroicRealms.com.  So, here's my miniature photography 101 article in its entirety.  Ignore the references to people and places; except any part about owing me.  Message me and we'll work something out!

Please note; this is not the definitive article on this subject.  This is just one way, that is fairly easy to go about, that will let you get some good results.

Miniature Photography:

This is actually a fairly complex question and this will be a lengthy post.  You owe Kaos a dessert from Joyce's shop for pointing me to your question!  The problems you need to solve (in no particular order) are lighting, depth of field, focus, and background.  For a starting point, I'm going to assume that your camera is of the point-and-shoot variety.  It has some sort of zoom control and a few different shooting modes, but no real control over focus or the actual exposure settings.  You will need a tripod of some sort; a small table top model will work.  As Kaos stated, you could build a light box.  This is the best solution overall and not expensive, but a bit of a pain to store so we'll go ultra-simple to get a nice background.  Get a piece of poster board and spray paint one side of it grey.  Use cheap matte finish grey primer of some sort....like from Walmart or Lowes or something.  Make sure it is a nice even coat...spray 2 or 3 times if you have to.  Tape or thumb tack one end of the poster board to a wall so that about 1/3 of the length is on the wall, and the rest is laying on a desk or table that is pushed up against the wall.  Tape the bottom end of the poster board to the desk or table.  Make sure you have a nice smooth curve in the transition from wall to desk and you now have a nice seamless background for taking photos of your models.  Carefully un-tape it when done, roll it up and store it safely in a corner until you need it again.  Use grey spray paint because it will make it easier for your camera to get a good exposure and easier for you to color correct the final photos later on.  Lighting:  ideally you want 2 lights, but one will do.  Goose neck desk lamps are fine.  Get daylight balanced bulbs for your lamp(s).  They are better for painting by, and cameras are designed to work best with daylight....always have been.  Yes, modern digital cameras have white balance settings but they are inconsistent.  You will get the best results in more ways than one if you get daylight bulbs.  If you have trouble finding them, check at Walgreens.  I have bought daylight balanced compact florescent bulbs there before.  Place the model you want pictures of on your background.  Leave about 3-4 inches behind the model before the curve of the background starts up toward the wall.  You may need to adjust this spacing later....we're going to try to put the shadows from the model into this space so they are not on the wall behind the model messing up your photo.  A larger model will for sure need more space behind it.  If you have 2 lamps place one on either side of the model, approximately 45 degrees in front of the model, and aim the lights down toward the model from about 45 degrees.  This setup throws the shadows behind and to the sides of your subject and minimizes them because the shadow cast by one light is hit directly by the other light reducing its intensity by 1/2.  If you have just one light then put it directly in front of the subject again angling down from about 45 degrees.  The shadow should be cast directly behind the subject this way.  The downside to a single light is that the light and your camera are competing for the same space so some fiddling around for best results will be required.  Put your camera on the tripod.  If your tripod allows it, consider rotating the camera to a vertical photo format; this allows you to zoom closer to the subject, filling the frame better.  Focus is easier to deal with so I'll tackle it first.  Your auto focus camera may or may not focus right on your model the way you want it to.  If your camera has a manual focus option (not likely) then use that and focus where you want to.  If not, keep hitting the shutter release button on you camera (only pressing it half way).  Each time, the camera is likely to focus on a different point on the model....or it might not.  It depends on the camera, the model, the lighting, etc.  If the camera keeps focusing on an arm pointing toward the camera or some such place rather than the main body of the model then you need to trick your camera.  Point the camera at the model's base and usually it will focus on the base which gives you a consistent point of focus from shot to shot.  The deal breaker in close up photography is depth of field.  Here's a quick explanation:  In any photo there is a point of critical focus.  This is the actual point (or plane) that the lens of the camera is focused at.  Due to the physics of optics, there is an area both in front of and behind the point of critical focus that is considered to be in ACCEPTABLE focus.  This area of acceptable focus is called the depth of field and it varies depending on the focal length of the lens (physics), the aperture setting within the lens (physics) and the distance between the camera and the subject.  With most point and shoot cameras you have no control over your aperture.  The lens focal length varies with the zoom setting, and you can place the camera where you choose.  Use the 2 settings you have some control over to maximize your depth of field and you won't go far wrong when taking photos of miniatures.  Depth of field is why I generally do not use a macro setting.  Macro mode is for getting your camera very close to the subject which compresses the depth of field.  With a simple mini that exists primarily within 1 plane it can work but I usually don't bother.  A second common problem with macro mode is that usually macro mode turns your flash on by default.  That flash will give you nasty harsh shadows.  If you can turn your flash off in macro mode then give it a shot; cameras are getting better all the time.  Yours might have an awesomely programmed macro mode that does a phenomenal job.  If not, then do the following.  Set you camera up about as far from the model as the camera's minimum focusing distance; usually about 18-24 inches (check your instruction manual).  This is as close as the camera can focus the lens without switching into the macro mode.  Then use the zoom (optical only, NO digital zoom) to crop in on the subject.  The longer focal length of the zoomed lens reduces your depth of field, but that is balanced out somewhat by the increased distance between the camera and the subject.  Use a remote release to trigger the camera if you can.  If not, use the camera self timer mode to reduce camera shake as the photo is taken.  Shoot multiple shots of the model, turning the model for different views.  This way you can post front and back photos to show off your paint jobs, and/or you might get lucky and find the perfect angle to view your masterpiece from while experimenting.   The last problem you will have to deal with is called color space.  In a nutshell, every electronic device has its own color space.  Your camera "sees" and records an image within its color space.  Your computer and your software then "reads" and interprets the image file with a different color space.  Neither of these is likely to match each other or what your eye sees when you're taking the photo.  If you want to print a photo, your printer has its own color space too! What you need to do is use image editing software to adjust what you see on the computer so it matches the subject.  Photoshop is the standard of the industry but ridiculously expensive.  The editing software that came with your camera will do fine for what we need here.  If you threw the disc away then go online and download the GIMP which is a ridiculously full featured editing software like Photoshop....but free.  You will most likely need to lighten the photo up a bit and you may need to tweek the color balance a little bit.  The grey background you made provides a neutral tone that allows your camera's light meter to get the exposure as accurate as possible.  It is also a neutral color so doesn't create any color bias in the final photo.  Extraneous light sources in the room where you are shooting could mess up either.  Turn off extra room lights while shooting if possible.  Once you've shot a few photos try experimenting with the white balance settings to see what color bias each one gives you: daylight should be best, but experiment.  As far as image editing, first crop relatively close to your subject.  You want to show off the model, not the background....no matter how super-cool it is.  After cropping, adjust the exposure and/or color.  In Photoshop the auto levels feature will take care of 90% or more of the editing job by itself when you are dealing with photos of miniatures.  You'll have to play around with other software to see what features they have and what works.  When you get the photo where you want it, re-size it for display on the web and you're ready to go.  Play around with the info here and post your results....I'll do what I can to help get you dialed in.  You can re-pay all this typing with Moose's pizza the next time I'm up for a visit!   big_smile   Look forward to seeing your results.

Monday, August 6, 2012

Tyranids! 2011 Armies On Parade Entry!

In the interests of 1, getting used to updating a blog, and 2, getting something for people to look at on said blog, here's a quick update with photos of my 2011 Armies On Parade entry.  My Tyranids!  When I first decided to build a bug army I wanted ruined city/rubble bases, so that meant I wanted really bright colors so they would stand out.  I think I managed that goal!  I've heard some comments where people think the bright models are silly, because 'Nids should be more "naturally" colored or have camouflage.  Guess they've never looked at pictures of poisonous tree frogs on the Internet their folks provide for 'em!  Maybe bright green and gold WAS perfect camo on the last planet the Hive fleet stopped off at for a quick brunch.  All I know is I enjoy painting them, they're fast to paint, and I really dig how they look on the table.  On top of that, they won me 1st Best Painted, and 2nd Player's Choice at the Alamo 40K Indy GT in 2011.  They won 2nd Best Painted at Wargames Con 2011.  They won the Parade Day Qualifier at Games Workshop: The Market at Town Center, in Sugarland Texas.  And models or objective markers from this army have been featured on the BoLS Pic of the Day 4 times that I know of.  Yeah, I LIKE my bugs.  I look forward to having them all painted some day (that's gonna be a while!) so I can throw them all down in a huge Apocalypse game. Without further ado, here's some photos....

First up, the entire army with objective markers on the ruined city display board.


Next, 1 of the Carnifexes (Carnifexi?)
 
 Easter Gargoyles!

 Hive Guard and my Doom of Malan'tai conversion.


 Hormagaunts and a Tyrant Guard.

 Mycetic Spore!  I have a different design that I sculpted and cast up, but this one, made by my friend Merlin, was used due to space considerations on the display board.  It gets rave revues, as it should.  Merlin does great work!

 Swarmlord and the best 'Nid objective marker ever!  Converted from a Carnifex, LONG before GW brought out a model for him.


Genestealers.   I like the old Genestealer models more than the new ones, but they never seemed to "fit" with the rest of the Tyranid models.  So I sculpted carapace plates for their backs and heads, learned how to make molds, and cast up enough for my whole army....96 first edition Genestealers.  Thank You first and second edition Space Hulk!  Look forward to having all of them painted and playable!


 Termagants.


 Tervigon.  Also converted from a Carnifex before GW had a model.

 Termigant being born.  This part of the model generates 2 responses; gross! and awesome!  That's the effect I was going for!


Hope you like them!  I'm supposed to play my first game of 6th Edition 40K tonight, and start teaching a couple of guys how to paint better.  What that means is I should have some material for the next update!  Until next time.....

Friday, August 3, 2012

We Have Ignition!

So, I've been debating with myself for the past few weeks whether or not I want to deal with a blog.  I've obviously decided to give it a go.  On the one hand, it could be nice to be able to post updates on my painting projects and Works In Progress.  On the other hand, it could just be one more thing to make time for, and at times (like trying to finish up my painting for Games Day) darn near impossible to make time for!  What can you expect?  Not much right away!  Over the next couple of weeks, I'll try to post some history stuff; past Armies on Parade entries, recent painting, and most importantly, my recent Silver Demon winning unit from North American Games Day 2012.  Beyond that, I'll be talking about and showing photos of my current painting projects, both my own and commission work.  I'll also be posting progress reports as I get ready for events I plan on attending.  If I can figure this whole blogging thing out enough, I'll also try to add in some "how to" type articles to help people get solid table top results on their miniatures in less time.  I often hear people lament that they are too slow at painting, or painting is too hard, I just want to play.  Well, I'm here to tell you that painting to a nice table top standard is not difficult once you know a few basic techniques, and more importantly, it does not take a great deal of time.  My army painting goal is to have finished models that take less than one hour each to paint.  If its taking longer than an hour to paint, then I'm using the wrong technique, or its a ridiculously difficult color scheme.  These days my "standard troop" models take me between 30 and 45 minutes each depending on what I am working on and win me painting awards at tournaments.  I'm supposed to be helping some local players with their painting next Monday night.  I'll let you know how it goes and we'll be off!