Showing posts with label 40K. Show all posts

Wednesday, November 14, 2012

Daemon Prince of Tzeentch!

The Demon army is assembled!  Whew!  I'm really looking forward to painting these models.  There will be so much variety and new things to try.  First I have to knock out a little commission work though.  A couple of days ago I started on 2 Ork Weirdboyz.  When they are finished, I need to paint Lysander of the Imperial Fists and some tactical marines to go along with him.  THEN I will get to shift my main focus to my Demons.....soon, very soon!  I should have some fresh paint jobs to show off soon though....and hopefully I can squeeze in a how-to article for painting something.  In the mean time, here's my Daemon Prince of Tzeentch.


I'm not to sure about the mohawk.  It's not what I originally intended; but it's how it ended up.  I may leave it in homage to the dreaded "Red Era" of Games Workshop when I first got involved with their games.  I'm quite pleased with the rest of the model and how the sculpting/conversion work turned out.  I'm looking forward to lots of color fades on him and painting some magical fireball goodness!


A little wych fire on the head of his staff.   I may do a little more work on the staff; filling it in some so it will look like a heavily carved wooden staff.  I have a little time to decide.


I thought about picking up some feathered wings to bring him more in line with the Lord of Change but didn't want to spend any more money on the army at this point.  I DID want to play up the "change" aspect of Tzeentch so I sculpted a few feathers on each wing; both inside and out.  You can also get a pretty good look at the trailing "tail" of the fireball he is throwing.  I was trying to add some motion to the model.  Not sure I pulled that off, but I'm happy with how it looks.  Comments?

Wednesday, November 7, 2012

Skulltaker....and Rant in GW Major

So, finally getting back to the blog.  I actually tried a few days ago, and Blogger was having issues and wouldn't save anything.  It kept telling me I had logged out.  I decided that someone didn't want me to post that day, so here I am, trying again. 

First, I need to get something off my chest.  Sometimes (more and more often) Games Workshop really irritates me!  The latest reason has to do with coverage from the various Games Day events around the world.  Last week, via a post by Mathieu Fontaine (winner of many, many Golden Demon trophies) on Facebook, I found out that there were a few photos from Games Day France (specifically Golden Demon winners) up on GW's website.  This was about 4 days after GD France.  North America Games Day was the end of July and there's still no photos up from it!  Three months!  Where is the coverage from the other Games Days?  Games Workshop, you make some really great games.  You also make some really good miniatures (don't get cocky, there's LOTS of other awesome miniatures these days.)  The way you interact with your customers/fans; not so good.  You're getting more and more competition all the time GW: better watch out, people are getting tired of dealing with you. 

Now that I've vented a little......here's some pictures of my Skulltaker-on-a-Juggernaught conversion!  I've seen a few of these over the years, and they never look right.  Always, Skulltaker is just stuck on the back of a Jugger and is balancing there like he's a circus act.  I gave him reigns to hold on to; which meant I had to swap his sword from one hand to the other.  It went smoother than I was afraid of, with only a little putty work to finish him off.  What do you think?

 I cut away the flaming skull, and then repositioned his hand so he could be holding the sword.  Swapping the sword; easy.  Repositioning the hand; tricky.  I didn't want to try sculpting an entire hand, so I carved away until I had just the hand with a cylinder shape in it that would look like the sword hilt.  I then cut the fingers at a knuckle joint and bent the hand around the "hilt."  Rebuilding the joint with intact fingers on each side of the gap wasn't too tough.


  Here, I had to cut the hand free from the arm so I could reposition it....without damaging his armor!  I then pinned the hand to the arm, and built a new wrist from Green Stuff.  Some plastic chains from the Skullcrusher kit finished off the look.  I'm pretty pleased with the overall look.  This was a pretty fun conversion to do.  This was my first conversion using a Finecast model.  Finecast definitely has some problems, but this project was much easier to pull off with resin as opposed to metal.  Comments?

Wednesday, October 17, 2012

Daemon Assembly Nearing Completion.....

Like the title says, I'm almost done with the assembling stage of the Chaos Daemon army for 40K.  Yes, I'm slow at assembling models.  I want them to look good when I'm done so I'm careful about poses and getting the mold lines cleaned good.  I'm also not sure which I dislike more: assembling and cleaning models, or base coating them?  Both suck.  I'm down to the last 4 models for the 2K list I'm play testing.  After a game Monday night, I'm 0/1 at 2000 points, and 1/1 overall with the Daemons.  I'll play a few more games first, but I'm not sure how much I'll like Skulltaker and the Bloodcrushers.  They're just seem to be SO slow!  I probably just need to figure out how to use them.  Brand new army and all that.  Like I said; play testing.  As far as assembly goes, I need to fill gaps on Be'Lakor (Slaanesh Daemon Prince), fill gaps on the one metal Bloodcrusher I have built, and finish a couple conversions.  Skulltaker is the first.  He's mounted on a Juggernaught, but I'm going to swap his sword into his left hand so I can put reigns (made of chain) in his right hand.  I think that will look pretty good.  The last model will take the most work.  I'm making a Daemon Prince of Tzeentch out of the plastic DP kit.  I've got lots of ideas on this one, but not sure exactly what all will make the final cut and be a part of the model.  You'll just have to wait for pictures of the finished product....hopefully within the next couple of weeks.  Wait For It!

Here's a couple photos of my conversion for The Masque.  I have a serious dislike of the GW model.  I bought the Lelith Hesperax model the week it came out with this conversion in mind.  I finally got around to it!  Its a pretty simple conversion.  I gave her one Daemonette claw.  The other arm is stock other than being lengthened slightly.  The one foot has been sculpted over to make it look daemonic.  Lastly I gave her a couple of small horns....which didn't photograph well.  They look better in person, I swear!  Hope you like it!


You can also see she has a stacked laminate base like I wrote about back in September.  She's pinned and glued to the laminate base, and the laminate base has a magnet epoxied into the bottom.  The plastic base has a scrap of sheet metal glued to it; she's easily swappable to a square Warhammer Fantasy base when the time comes.  What do you think of her?

Tuesday, October 9, 2012

Flamers are Gross!

So, I played my first game with Chaos Daemons last night.  The only models I had on the table that were painted were my Silver Demon winning Plaguebearers.  They did exactly what they were supposed to do; grabbed the objective (the Relic) and walked off with it while the rest of the army beat faces in.  It was a 1500 point game vs. a fairly generic Blood Angels list that my buddy Kirk has been experimenting with.  We quickly arrived at the same conclusion: Flamers are disgustingly, grossly, powerful!  I'd consider buying more and running multiple units but I really hate spam lists like that. 


To give you an idea of how powerful they are, here's the breakdown.  In 2 turns my 6 flamers (138 points) killed 10 assault marines, a priest, (I think) 10 Death Company, a Chaplain, and 2 Devastator Marines.  I don't have an exact points total, but Kirk said it was over 500 points.  In between killing the majority of that, and killing the Devastators the unit soaked up 100% of the remaining firepower of Kirk's army which left 1 model with 1 wound remaining.  Now, in all fairness, the Flamers were helped out by The Masque and her shooting Pavane of Slaanesh 3 times per turn which let me clump up the Death Company for maximum template coverage.  So, you factor her cost in, and 238 points killed one third of Kirk's army in 2 turns!  Yikes!  The Masque was Pavaning other units during this time too in order to shorten the Bloodletter's charge range.  In all fairness, I believe Kirk moved to charge the Flamers with his Assault squad to see if they are as scary as we had read.  They are.  Don't charge them!  Shoot them.  A lot. 

It was a fun first game with Daemons.  Both Kirk and I learned a ton about Daemons in 6th Edition.  I'm sure the next time we play, the Flamers will be a high priority target for his shooting.  I'll need to be careful with their deployment and keep them screened to get them in close enough.  I'll also have to choose their target well to get good use of them; I don't expect to get 2 turns of shooting out of them from now on unless the dice REALLY favor me!  Not likely!

Assembly is moving forward.  I'm almost done with all of the big annoying models.  The worst thing I have to deal with is finishing the assembly on the pewter (previous edition) daemonettes, and a bunch of mold line cleaning.  Then, on to painting!  Stay tuned!

Sunday, October 7, 2012

Tyranid Defense Lines!

So, just a quick update for now.  I'm building Daemons as fast as I can which is not very.  This whole job thing really drags down the important stuff sometimes!  The bills are getting paid though so I guess that's good.  I'm getting close to having 1500 points ready to start playing which I'm looking forward to.  More on that hopefully in the next post.  For now, I've got a couple photos from my buddy Chris from his blog Lordokaos.  The photos are of a Tyranid (Aegis) defense line.  He recently painted up a bunch of these pieces for his bugs now that you can buy a defense line in any game.  I originally sculpted these pieces a couple of years ago when Planetstrike dropped.  I thought it would be cool to have actual Tyranid scenery when playing as the defender in games of Planetstrike.  I sculpted the original, and then made a mold and cast up a bunch of them.  Chris wanted some once he saw them so I traded him a bunch for some miniatures.  What do you think?

 I based the original sculpts on a single Aegis line piece for size.  These are a tiny bit wider, but don't provide as much actual coverage due to the shape.  They look good on the table so I think its a good trade off.


With a couple of models for scale.  Careful with your firing angles on that Carnifex; don't give him the better cover save!  The marine is from Chris' own chapter.

Incidentally, check out lordokaos to see Chris' long term project; 40K of 40K.  He's working on getting 20,000 points painted of two separate forces to be able to play a 40,000 point game of 40K!  The two forces are Tyranids, and Imperials.  The Imperials include Space Marines, Imperial Guard, and Titans.  He's well on his way too!  I believe he's around 16,000 for Tyranids, and I think he's just over 10,000 for Imperials.  Lots of people have big armies, but how many people do you know with armies that big that are fully (and well) painted?

Thursday, September 27, 2012

Progress! Slow But Steady.

Well my Daemons are starting to materialize out of the warp!  I now have the Bloodthirster, 4 Fiends of Slaanesh, 6 Flamers, and 5 (old-school metal) screamers assembled.  All of these models have been based so they can quickly and easily be swapped from round to square bases.  I'm really feeling the draw to get some paint on some of these models too!  I also have all of the pieces prepped to assemble a Daemon Prince of Slaanesh (Be' Lakor The Dark Master.)  I think that model will rock for Slaanesh!

Not much else in the works currently.  More Daemon assembly in the near future.  Here's the photo I promised last post though.  This was the first stacked laminate base I ever made.  Ignore the paint job; it was the best I could do about 4 years ago.  I'm still pretty fond of the flamey writing on the cloak though!


Wednesday, September 19, 2012

Making stacked Laminate Bases


Sorry for the length between posts.  Real life and all that.  But, the bills are getting paid, and now I have time to post an update!  I haven't gotten much done since I posted last.  My desk is still in a shambles as you can see below.  No painting done, minis in various states of assembly, new paint to get transferred into dropper-style bottles.  Its horrific.


I've started making some progress though.   I'm getting some assembly and green stuff work done on my Chaos Daemons with the goal of getting 2000 points assembled for 40K so I can start learning the army.  I will then move forward with painting consignment work, and start actually painting said Daemons.  The big slow down has been figuring out what to do with bases for the larger models since I want to use the army for both 40K and Fantasy.  Rank and file infantry is easy: put them on round bases, and make movement trays that hold the round bases.  Something kinda like the War of The Ring trays GW has out but cheaper.  Single model units, and skirmishers are another story.  Here's what I'm doing so far.....until I figure out something faster anyway!


This is the base I'm working on for a Bloodthirster.  I've made a base from counter top laminate (Formica, etc.)  I snap a few pieces up to roughly the correct size with pliers, and then glue them all together into a stack.  I then took my Dremel and routed out an area to epoxy in a rare earth magnet.  I epoxied a scrap of sheet metal I'd cut to size onto a stack of the old thin style 60mm round GW bases.  I use epoxy for this type work because superglue is too brittle when cured and I've had it break a number of times when magnets were involved.  The stacked laminate base is sized so it will also fit the correct 50mm square base the Bloodthirster needs in Warhammer Fantasy.  

Where do I get counter top laminate you ask?  Well, I actually have some scraps of it left over from the last remodeling project here at la casa de Bob.  If you're not so fortunate, then I have 2 suggestions.  First, contact a local cabinet maker and ask for some scraps and/or broken pieces too small for their use.  Unless yesterday was garbage day they'll let you grab some out of the trash.  If that doesn't work, go to your local DIY store.  The closest one to me happens to be Home Depot.  Lowe's works too, as will anyplace that sells kitchen cabinetry.  Wander through the kitchen showcase area and you'll see little 2 inch by 3 inch color samples of laminate.  They are free.  Grab a couple big hands full and go build some bases.  A note of caution: be careful of wandering through the new kitchen area of the store with your significant other.  You may end up with new kitchen cabinets instead of that new toy from Forge World!
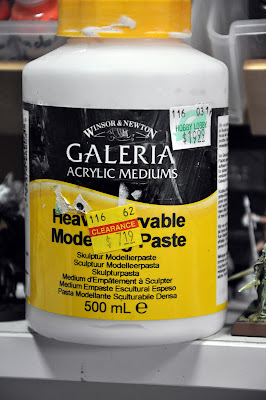


In the past when making bases like this I've used green stuff to fill in gaps to make the base look like something other than a stack of thin scraps.  I'd read in a WIP post over on Coolminiornot.com about using this Heavy Carvable Modelling Paste  to build up scenic bases so I'm giving it a try.  Check the clearance section at the hobby store!  This bottle had been dropped or something and the lid had come off, making a mess.  I checked it in the store, and the material inside was still good, and 95%+ of it was still there.  I bought it for the discount you can see, and then cleaned the cured paste from the cap threads to make sure the lid seals properly.  I very large container of modelling paste for a much better price!  I just scoop the paste out with a sculpting tool and smear it into the edge of the base, filling in the gaps.  I went back and wiped excess away with my finger.  The last step was to use the corner of a sculpting tool to recess the paste a little bit so it looks more like layered shale/slate type stone when done.


Here's the Bloodthirster on his base!  He still needs some green stuff work where he was pinned together (every joint was pinned.) but you get an idea of what the base will look like.  The best part is he is easily swappable from the round base to a square one when I need to!  The only down side to making bases this way is that it is slow.  I'll keep plugging along though while I research faster ways of getting a similar result.  I've got photos on another computer that show a painted version of this style of base.  I'll transfer one of those over and include it in the next post so you get a better idea of what this will look like.  Until next time!

Wednesday, September 5, 2012

Papa Nurgle is Back!

So, this time I'm going to show you some painting done by somebody else.  I have a gaming buddy who likes to get his Nurgle on.  He's a relative newcomer to 40K and painting, but he likes painting and wants his models to look good.  He also doesn't like playing with (or against) unpainted models.  I really respect that in a fellow gamer!  He'd been pretty frustrated with his painting results.  Combine that with him being crazy busy at work and he had pretty much dropped off the local gaming map.  His motivation had not been helped by his wife being an art major; she can sit down and paint a model in much less time and it looks really good.  Yeah, frustrated would be a good adjective to describe him. 

When he told me he'd picked up a box of the new Plaguebeareres, I told him to meet me and I'd demonstrate the basic techniques I used to paint my unit of Nurgle goodness.  Here's the result:


Yes, I know the bases aren't done yet.  He didn't want me to take them and photograph them yet, but I wanted to show you that it CAN be done!  We spent about a half an hour, or maybe 45 minutes total over two sessions.  I painted one of these models, and James worked on another.  He went home and knocked out the rest.  Win yourself a genuine, original, mint condition, out of print No-Prize if you can tell me which model I painted out of this group.  Yes, a relatively inexperienced painter can get this kind of result with the right methods.  FYI, I'll bring them back for more photos once he has the bases done!

After painting these models, my buddy's enthusiasm for painting has been rekindled.  He's done a bunch of painting in the past couple of weeks, and he's started playing again too!  He's looking ahead to how he might expand his army, and is even talking about what army he might start once he has his Nurgle stuff painted.  He's also making noise about making the trip to The Alamo 40K GT next spring with me.  Say's he wants to give me a run for my money for best painted.  I say, "Bring it on!"


Friday, August 3, 2012

We Have Ignition!

So, I've been debating with myself for the past few weeks whether or not I want to deal with a blog.  I've obviously decided to give it a go.  On the one hand, it could be nice to be able to post updates on my painting projects and Works In Progress.  On the other hand, it could just be one more thing to make time for, and at times (like trying to finish up my painting for Games Day) darn near impossible to make time for!  What can you expect?  Not much right away!  Over the next couple of weeks, I'll try to post some history stuff; past Armies on Parade entries, recent painting, and most importantly, my recent Silver Demon winning unit from North American Games Day 2012.  Beyond that, I'll be talking about and showing photos of my current painting projects, both my own and commission work.  I'll also be posting progress reports as I get ready for events I plan on attending.  If I can figure this whole blogging thing out enough, I'll also try to add in some "how to" type articles to help people get solid table top results on their miniatures in less time.  I often hear people lament that they are too slow at painting, or painting is too hard, I just want to play.  Well, I'm here to tell you that painting to a nice table top standard is not difficult once you know a few basic techniques, and more importantly, it does not take a great deal of time.  My army painting goal is to have finished models that take less than one hour each to paint.  If its taking longer than an hour to paint, then I'm using the wrong technique, or its a ridiculously difficult color scheme.  These days my "standard troop" models take me between 30 and 45 minutes each depending on what I am working on and win me painting awards at tournaments.  I'm supposed to be helping some local players with their painting next Monday night.  I'll let you know how it goes and we'll be off!