Sorry
for the length between posts. Real life and all that. But, the bills
are getting paid, and now I have time to post an update! I haven't
gotten much done since I posted last. My desk is still in a shambles as you can see below. No painting done, minis in various states of assembly, new paint to get transferred into dropper-style bottles. Its horrific.

I've started making some progress though. I'm getting some assembly and green stuff work done on my Chaos Daemons with the goal of getting 2000 points assembled for 40K so I can start learning the army. I will then move forward with painting consignment work, and start actually painting said Daemons. The big slow down has been figuring out what to do with bases for the larger models since I want to use the army for both 40K and Fantasy. Rank and file infantry is easy: put them on round bases, and make movement trays that hold the round bases. Something kinda like the War of The Ring trays GW has out but cheaper. Single model units, and skirmishers are another story. Here's what I'm doing so far.....until I figure out something faster anyway!

This is the base I'm working on for a Bloodthirster. I've made a base from counter top laminate (Formica, etc.) I snap a few pieces up to roughly the correct size with pliers, and then glue them all together into a stack. I then took my Dremel and routed out an area to epoxy in a rare earth magnet. I epoxied a scrap of sheet metal I'd cut to size onto a stack of the old thin style 60mm round GW bases. I use epoxy for this type work because superglue is too brittle when cured and I've had it break a number of times when magnets were involved. The stacked laminate base is sized so it will also fit the correct 50mm square base the Bloodthirster needs in Warhammer Fantasy.
Where do I get counter top laminate you ask? Well, I actually have some scraps of it left over from the last remodeling project here at la casa de Bob. If you're not so fortunate, then I have 2 suggestions. First, contact a local cabinet maker and ask for some scraps and/or broken pieces too small for their use. Unless yesterday was garbage day they'll let you grab some out of the trash. If that doesn't work, go to your local DIY store. The closest one to me happens to be Home Depot. Lowe's works too, as will anyplace that sells kitchen cabinetry. Wander through the kitchen showcase area and you'll see little 2 inch by 3 inch color samples of laminate. They are free. Grab a couple big hands full and go build some bases. A note of caution: be careful of wandering through the new kitchen area of the store with your significant other. You may end up with new kitchen cabinets instead of that new toy from Forge World!
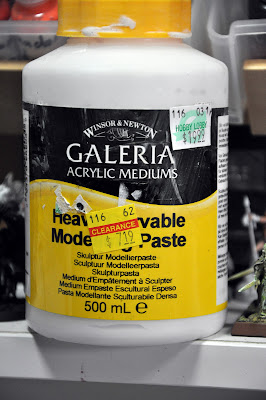
In the past when making bases like this I've used green stuff to fill in gaps to make the base look like something other than a stack of thin scraps. I'd read in a WIP post over on
Coolminiornot.com about using this Heavy Carvable Modelling Paste to build up scenic bases so I'm giving it a try. Check the clearance section at the hobby store! This bottle had been dropped or something and the lid had come off, making a mess. I checked it in the store, and the material inside was still good, and 95%+ of it was still there. I bought it for the discount you can see, and then cleaned the cured paste from the cap threads to make sure the lid seals properly. I very large container of modelling paste for a much better price! I just scoop the paste out with a sculpting tool and smear it into the edge of the base, filling in the gaps. I went back and wiped excess away with my finger. The last step was to use the corner of a sculpting tool to recess the paste a little bit so it looks more like layered shale/slate type stone when done.

Here's the Bloodthirster on his base! He still needs some green stuff work where he was pinned together (every joint was pinned.) but you get an idea of what the base will look like. The best part is he is easily swappable from the round base to a square one when I need to! The only down side to making bases this way is that it is slow. I'll keep plugging along though while I research faster ways of getting a similar result. I've got photos on another computer that show a painted version of this style of base. I'll transfer one of those over and include it in the next post so you get a better idea of what this will look like. Until next time!


